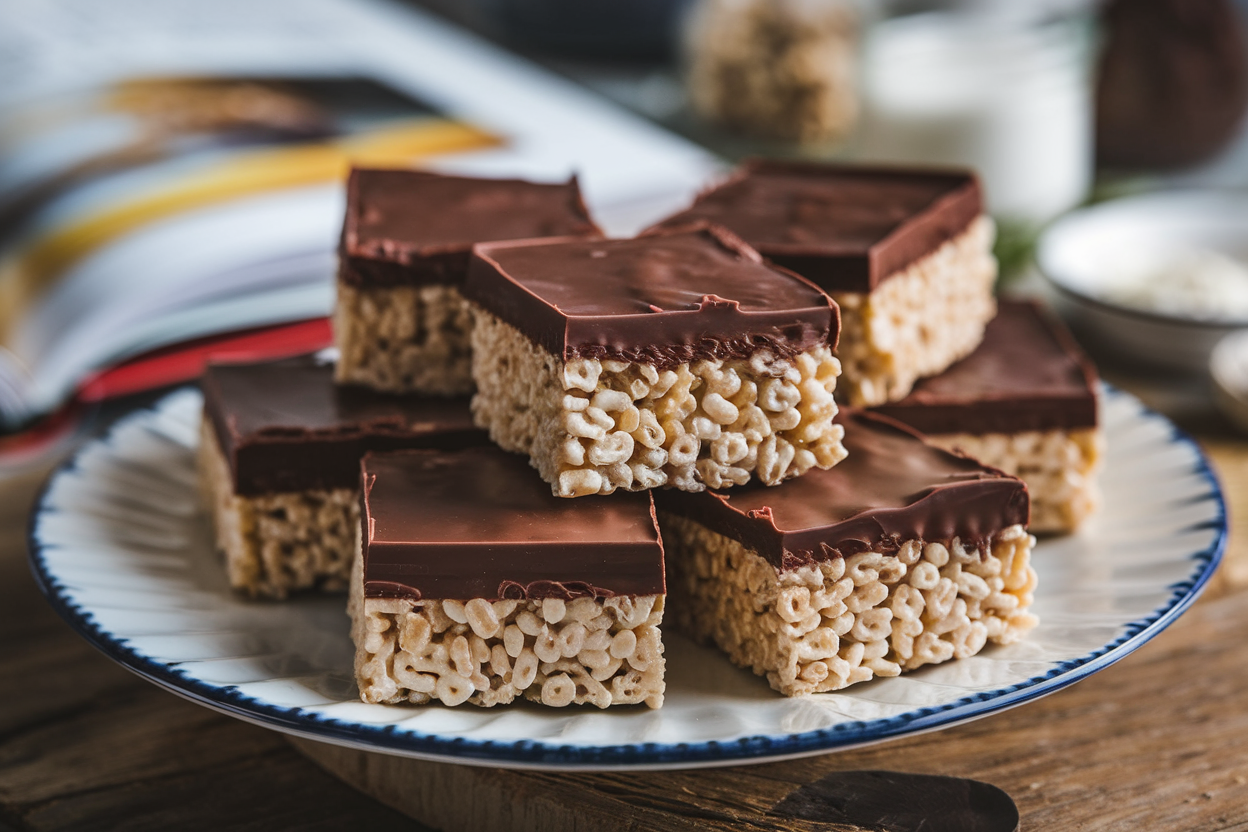
How to Make Chocolate Rice Krispie Treats (No-Bake)
Let’s be honest—there’s a reason Rice Krispie Treats have been a beloved snack for generations. But add chocolate, and suddenly you’re playing in a whole new league of sweet, crunchy goodness. No fancy pastry skills required.
These Chocolate Rice Krispie Treats are basically a one-way ticket to snack heaven, combining gooey marshmallows, crispy cereal, and velvety chocolate in one no-mess, no-fuss delight. If you want to impress without stressing, this recipe is your secret weapon.
What Makes This Recipe Awesome
First off, it’s ridiculously simple but looks and tastes like you spent hours perfecting it. The classic marshmallow-cereal combo gets a chocolatey upgrade that’s both comforting and indulgent.
You get that satisfying crunch mixed with a smooth, rich chocolate flavor that literally melts in your mouth. Plus, this recipe is incredibly versatile—perfect for last-minute parties, easy snacks, or a quick homemade gift that screams “I care, but I’m not a chef.” And of course, who doesn’t love that nostalgic vibe with a grown-up twist?
What Goes Into This Recipe – Ingredients
- 6 cups Rice Krispies cereal (or any crisped rice cereal)
- 4 cups mini marshmallows
- 3 tablespoons unsalted butter
- 1 cup semi-sweet chocolate chips (or chopped chocolate)
- 1 teaspoon vanilla extract
- Pinch of salt
Step-by-Step Instructions
- Melt the butter: In a large pot over low heat, melt the butter until it’s fully liquid and glossy.
- Add marshmallows: Toss in the mini marshmallows and stir constantly until they’re completely melted and smooth. No stubborn clumps allowed.
- Mix in vanilla and salt: Stir in the vanilla extract and a pinch of salt to balance all that sweetness.
- Add chocolate chips: Remove the pot from heat and fold in the chocolate chips quickly.
The residual heat will melt them to create that luscious chocolate swirl.
- Combine with cereal: Pour in the Rice Krispies cereal and gently fold until each piece is coated evenly in that chocolate-marshmallow goodness.
- Shape the treats: Transfer the mixture into a greased or parchment-lined 9×13 inch pan. Press down firmly but don’t squash the crispy texture out!
- Let it cool: Allow the treats to cool and set for at least an hour at room temperature (or 30 minutes in the fridge if you’re impatient).
- Slice and serve: Use a sharp knife to cut into squares, and try not to eat them all in one sitting. No promises here, though.
How to Store
Keep your Chocolate Rice Krispie Treats fresh by storing them in an airtight container at room temperature.
They stay perfectly chewy and crispy for up to 3 days—any longer, and they might start leaning on the stale side. If you want to extend their life, pop them in the fridge for up to a week, but beware, they’ll harden a bit and lose some of that magical softness. Pro tip: If refrigerated, let them come to room temp before enjoying.
Health Benefits
Okay, let’s get real: This recipe is mostly about pure joy, not kale-level health perks.
But if you want to extract some goodness from this treat, here you go: Rice Krispies provide a light source of carbs for quick energy. The chocolate chips contribute antioxidants—hello, flavonoids! And because it’s homemade, you control what goes in, avoiding many preservatives and additives found in store-bought versions.
Plus, it’s a great option to satisfy your sweet tooth without going full cake-mode.
Pitfalls to Watch Out For
Watch your heat settings, especially when melting the marshmallows! Too high, and you’ll scorch the butter or give your mixture a weird burnt flavor. Marshmallows are picky—low and slow wins the race.
Also, folding in the chocolate chips too early on super high heat might cause your chocolate to seize and become grainy (nobody wants gritty chocolate). Lastly, don’t press the treats too hard when you’re shaping them, or you’ll lose that beautiful airy crunch that makes these treats irresistible.
Recipe Variations
- Peanut Butter Chocolate Krispies: Stir 1/2 cup peanut butter into the melted marshmallow mix for a nutty twist.
- White Chocolate & Cranberry: Swap semi-sweet chips with white chocolate and toss in dried cranberries for a festive flair.
- Dark Chocolate & Sea Salt: Use dark chocolate chips and sprinkle flaky sea salt on top before the treats set for a sweet-salty punch.
- Mint Madness: Add a few drops of peppermint extract with the vanilla for that fresh, holiday vibe.
- Double Chocolate Crunch: Mix cocoa powder into the melted marshmallows before adding cereal for an all-chocolate experience.
FAQ
Can I use a different cereal instead of Rice Krispies?
Absolutely! Corn flakes, puffed wheat, or even fruity cereals all work fine.
Just keep in mind, different cereals bring different textures and sweetness levels, so choose based on your preference.
What if I don’t have mini marshmallows? Can I use regular-sized ones?
Yes, but you might need to chop the regular marshmallows into smaller pieces to ensure they melt quickly and evenly. Mini marshmallows just speed things up.
Can I make these treats vegan or dairy-free?
Totally doable!
Use vegan butter and marshmallows (plenty of brands exist now). For chocolate, pick dairy-free or vegan-friendly versions. The texture and flavor will still be amazing.
How do I prevent the treats from getting too sticky?
Make sure you properly grease your pan or use parchment paper before pressing in the mixture.
Also, allow enough time for the treats to cool and set before slicing and handling.
Can I add nuts or other mix-ins?
For sure! Just fold in chopped nuts, seeds, or even mini marshmallows after mixing in the cereal. Keeps things interesting and ups the texture game.
My Take
Look, Chocolate Rice Krispie Treats are the answer when you want a snack that’s fast, crowd-pleasing, and downright delicious.
I love how this recipe straddles the line between nostalgic simplicity and gourmet indulgence. Seriously, it’s like childhood memories with a grown-up upgrade—and no one’s going to judge if you eat half the pan solo. Whether you’re whipping these up for a party, your kids, or a midnight snack attack, these treats hit all the right notes: crunchy, chewy, chocolaty, and ridiculously satisfying.
IMO, this is one recipe everyone should have in their back pocket. Now, go make some—your sweet tooth will thank you.
Printable Recipe Card
Want just the essential recipe details without scrolling through the article? Get our printable recipe card with just the ingredients and instructions.