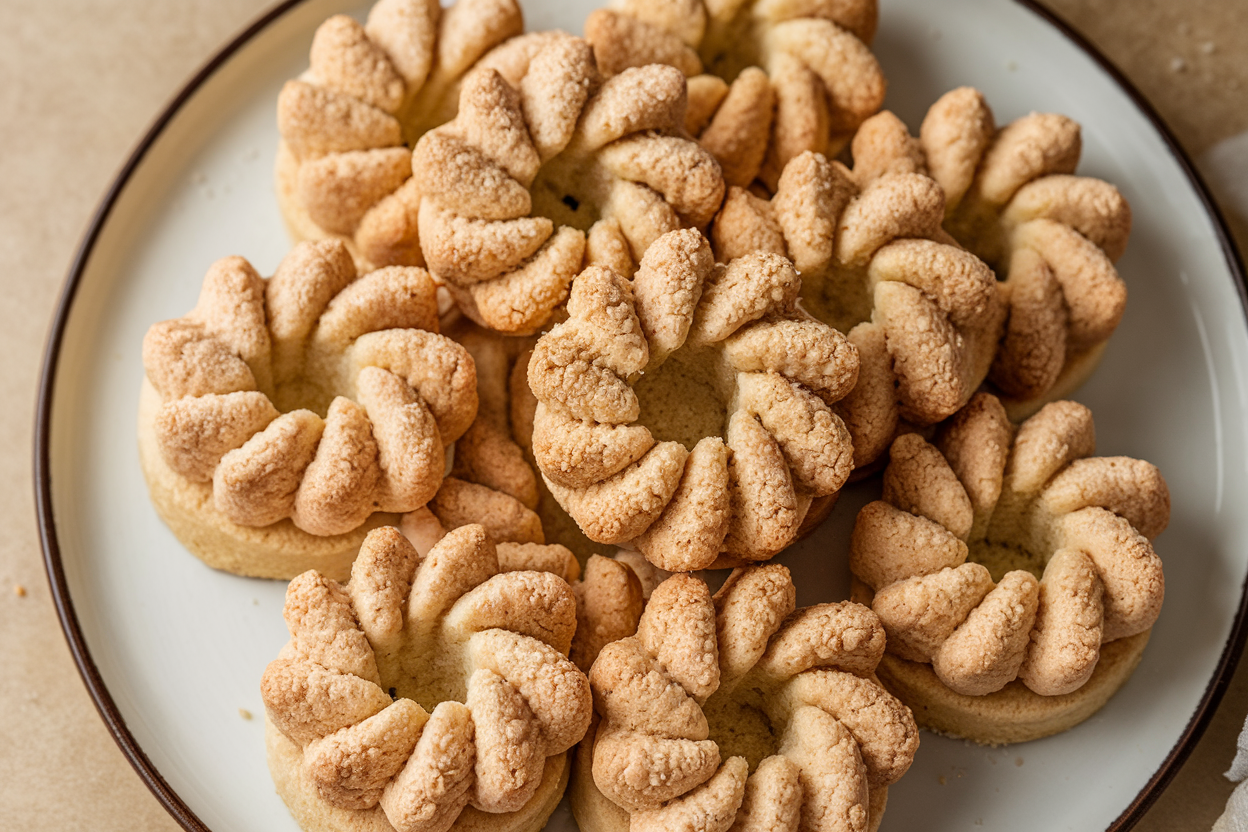
Whipped Shortbread Cookies That Melt Like Snow: The 3-Ingredient Treat You’ll Brag About All Winter
If a cookie could flex, this would be it. Whipped shortbread cookies look fancy, taste luxurious, and require less effort than your morning coffee. You beat three humble ingredients until they turn into clouds, bake for a few minutes, and boom—bakery-level magic.
They’re buttery, tender, and so soft they practically apologize before crumbling. Want a cookie that makes people think you know a pastry chef? This is your shortcut.
What Makes This Special
These cookies are the culinary equivalent of a mic drop: minimal ingredients, maximum effect.
The secret? Beating butter and sugar longer than you think necessary until the mixture is ultra-light. That aeration gives shortbread its signature melt-in-your-mouth texture instead of a dense crunch.
This version uses cornstarch to reinforce that delicate crumb and create the signature “whipped” softness. Even better, the dough handles like a dream—no chilling, no rolling, no drama. You can top them a dozen ways, but honestly, they’re perfect naked.
Ingredients
- 1 cup (226 g) unsalted butter, softened to cool room temperature
- 1/2 cup (60 g) powdered sugar (a.k.a. confectioners’ sugar)
- 1 1/2 cups (180 g) all-purpose flour
- 1/2 cup (60 g) cornstarch
- 1/2 teaspoon fine sea salt (reduce to a pinch if using salted butter)
- 1 teaspoon pure vanilla extract (optional but recommended)
- Optional toppings: sprinkles, chopped candied cherries, coarse sugar, or melted chocolate for drizzling
Step-by-Step Instructions
- Preheat and prep: Heat your oven to 300°F (150°C).
Line two baking sheets with parchment paper. Low and slow prevents browning and keeps the texture ultra-tender.
- Cream the butter and sugar—aggressively: In a stand mixer with the paddle or a hand mixer, beat the butter and powdered sugar on medium-high for 4–6 minutes, scraping the bowl once or twice. You want it pale, fluffy, and visibly increased in volume.
- Add vanilla and salt: Mix in the vanilla and salt just until combined.
Tiny detail, big flavor.
- Whisk dry ingredients: In a separate bowl, whisk flour and cornstarch to break up any lumps. This prevents pockets of starch that can make the texture chalky.
- Combine gently: Add the dry ingredients to the butter mixture in two additions on low speed. Mix only until a soft, pillowy dough forms.
Overmixing = tougher cookies.
- Portion: Scoop tablespoon-sized mounds (a small cookie scoop works great) onto the prepared sheets, leaving about 2 inches between.
- Shape and decorate: For the classic look, press the tops lightly with a floured fork to create ridges. Add sprinkles, a cherry half, or a gentle dusting of coarse sugar if you like.
- Bake: Bake 14–18 minutes, rotating the sheets once. The cookies should remain very pale with just the faintest golden color on the bottoms.
If they’re browning, your oven’s a bit hot—no biggie, just pull them.
- Cool: Let them rest on the tray for 5 minutes (they’re fragile when hot), then transfer to a wire rack to cool completely. They firm up as they cool.
- Finish (optional): Drizzle with melted chocolate or dust with powdered sugar once cool. Flex a little.
You earned it.
Storage Instructions
- Room temperature: Store in an airtight container for up to 1 week. Layer with parchment to prevent sticking and protect those delicate tops.
- Freezing baked cookies: Freeze in a single layer, then transfer to a freezer bag for up to 2 months. Thaw at room temp—still amazing.
- Freezing dough: Portion onto a sheet, freeze until firm, then bag.
Bake from frozen at 300°F, adding 2–3 extra minutes.
Why This is Good for You
No, it’s not a kale salad. But it is good for your social life and sanity. You get a dependable, crowd-pleasing dessert with minimal stress—aka more time with people you actually like.
The short ingredient list makes it budget-friendly and beginner-proof. On a practical level, these cookies are small, portionable, and not overly sweet. A couple with tea is satisfying without a sugar crash.
And the recipe is highly customizable, so you can tweak flavors and toppings to fit your preferences or dietary needs. Balance, right?
Avoid These Mistakes
- Using butter that’s too warm: Softened means slightly cool and pliable, not greasy or melty. Over-warm butter loses structure and leads to spreading.
- Under-creaming the butter: The airy texture depends on incorporating enough air.
If your mixture isn’t pale and fluffy, keep going.
- Overmixing after adding flour: This develops gluten and toughens the cookies. Mix just until combined.
- Baking too hot: High heat browns the bottoms and dries them out. Stick to 300°F; patience pays off.
- Skipping the cornstarch: It’s the secret to the melt.
Subbing all flour makes them more ordinary shortbread, not whipped.
Variations You Can Try
- Lemon Cloud: Add 1 tablespoon lemon zest and 1/2 teaspoon lemon extract. Finish with a light lemon glaze.
- Almond Snow: Swap vanilla for almond extract and top with sliced almonds. Simple, elegant, addictive.
- Mocha Swirl: Dissolve 2 teaspoons instant espresso in 1 teaspoon hot water; beat into the butter mixture.
Drizzle with dark chocolate.
- Spiced Holiday: Add 1/2 teaspoon cinnamon and 1/4 teaspoon cardamom. Top with sparkly sugar. Instant festive vibes, FYI.
- Jam Thumbprint Hybrid: Skip the fork marks; make a small indentation and fill with 1/2 teaspoon jam after baking while still warm.
- Gluten-Free Test: Use a quality 1:1 gluten-free flour blend and keep the cornstarch.
Texture stays surprisingly close.
FAQ
Can I use granulated sugar instead of powdered sugar?
Powdered sugar dissolves faster and creates a finer crumb, which is key for the meltaway texture. Granulated sugar can make them slightly gritty and less tender. If you must, pulse granulated sugar in a blender first to get it closer to powdered.
Do I need to chill the dough?
Usually, no.
The dough is stable enough to bake right away if your butter wasn’t too warm. If your kitchen is hot or the dough feels sticky, chill for 15–20 minutes to help the cookies hold their shape.
Why did my cookies spread?
The usual suspects: butter too warm, under-creamed mixture, or oven running hot. Also, measuring flour too lightly can cause spreading.
Weigh your ingredients if possible for consistency.
How do I make them look bakery-perfect?
Use a small cookie scoop for uniform size, press gently with a floured fork, and add a tiny, centered garnish. Bake on parchment, rotate the pan once, and remove before browning. A light powdered sugar dusting at the end hides sins—pro tip.
Can I make them dairy-free?
Yes, with a high-fat, plant-based butter that’s formulated for baking.
Stick margarines with high water content won’t whip the same, IMO. Expect slightly less richness but still a nice texture.
How many cookies does this make?
About 30–36 small cookies, depending on your scoop size and how generous you’re feeling that day. Smaller equals daintier and more meltaway drama per bite.
What’s the difference between whipped shortbread and regular shortbread?
Whipped shortbread is beaten longer and includes cornstarch, creating a lighter, more delicate crumb.
Classic shortbread is typically denser, uses granulated sugar, and relies more on pressing or rolling.
Wrapping Up
Whipped shortbread cookies are that rare win: low effort, high reward, and impossible to mess up if you follow a few simple rules. Cream the butter like you mean it, keep the oven chill, and don’t overmix. Dress them up or keep them minimal—either way, they’ll vanish fast.
Bake a batch, stash a few for yourself (seriously), and enjoy the applause without breaking a sweat.
Printable Recipe Card
Want just the essential recipe details without scrolling through the article? Get our printable recipe card with just the ingredients and instructions.