Pierogi Beef Skillet: The 30-Minute Weeknight Power Move You’ll Brag About
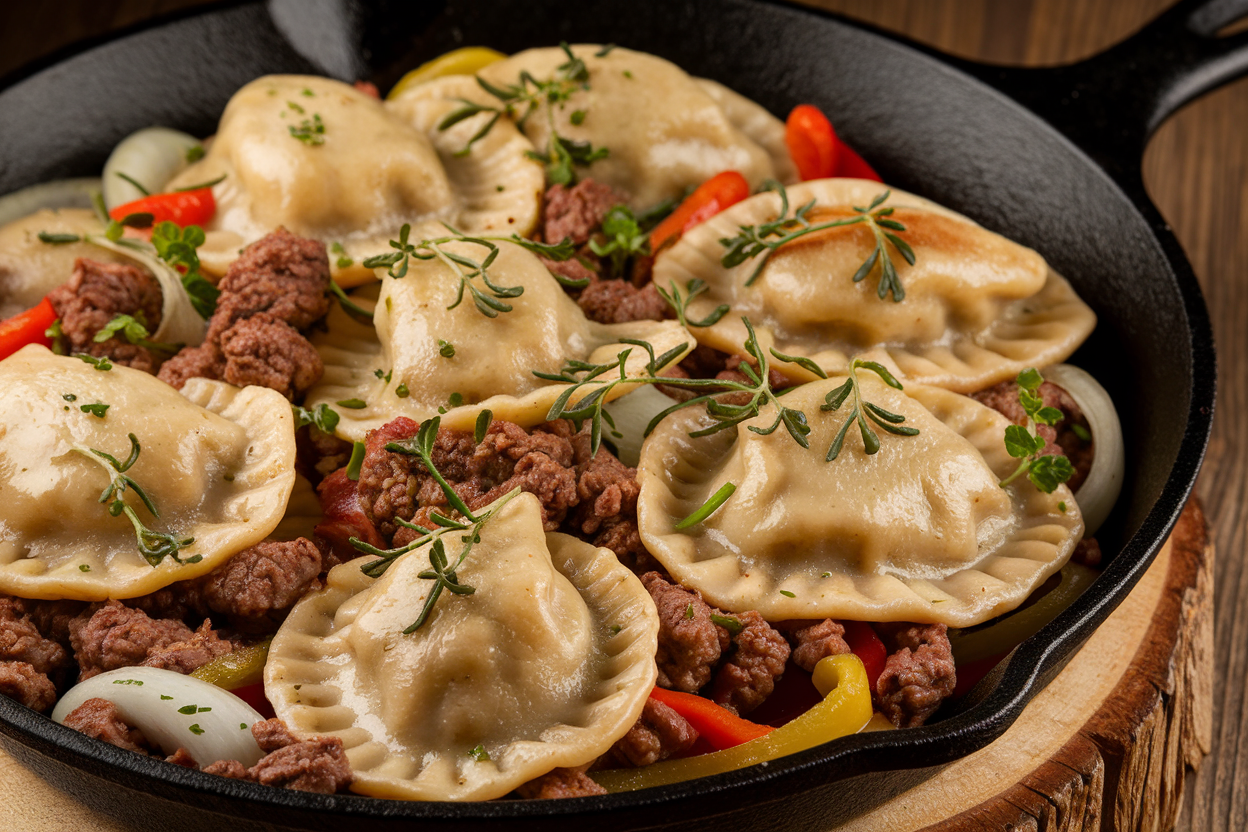
You want a dinner that hits like a cheat code: fast, hearty, and wildly comforting. Enter the Pierogi Beef Skillet—crispy potato dumplings meet savory ground beef, caramelized onions, and a silky, tangy sauce that tastes like you spent hours (you didn’t). It’s the kind of meal that makes your kitchen smell like you have your life together.
Your family will ask for seconds; your future self will thank you; your dishes will be minimal. That’s an ROI you can taste.
Why You’ll Love This Recipe
- Weeknight friendly: Ready in about 30 minutes with simple steps and zero culinary acrobatics.
- Comfort-food payoff: Golden, crispy pierogi + juicy, seasoned beef + creamy-tangy finish = actual happiness.
- Budget smart: Frozen pierogi + pantry staples deliver big flavors without a big bill.
- Flexible: Swap proteins, add veggies, tweak spice levels—this skillet plays nice with your fridge.
- One-pan magic: Minimal cleanup, maximum satisfaction. You’re welcome.
Ingredients Breakdown
- Frozen pierogi (1 to 1.5 pounds, potato and cheese preferred): The crispy, pillowy base.
- Ground beef (1 pound, 85–90% lean): Savory backbone.
Sub ground turkey or plant-based crumbles if needed.
- Yellow onion (1 large, thinly sliced): Sweetness and depth when caramelized.
- Garlic (3 cloves, minced): The flavor multiplier.
- Butter (2 tablespoons): Helps brown pierogi and adds richness.
- Olive oil (1 tablespoon): Keeps things from scorching and balances butter.
- Beef broth (1/2 cup): For deglazing and creating a quick pan sauce.
- Sour cream (1/3 cup): Creamy tang to finish; Greek yogurt works too.
- Dijon mustard (1 tablespoon): Sharpness that cuts through richness.
- Paprika (1 teaspoon, sweet or smoked): Warmth and color.
- Worcestershire sauce (2 teaspoons): Umami hit; don’t skip.
- Kosher salt and black pepper: To taste, layered throughout.
- Fresh parsley or chives (2 tablespoons, chopped): Bright, herbal finish.
- Optional add-ins: Sliced mushrooms (1 cup), bell peppers (1 cup), or frozen peas (1/2 cup).
Cooking Instructions
- Crisp the pierogi. Heat a large skillet over medium-high. Add 1 tablespoon butter and the olive oil. Place frozen pierogi in a single layer and cook 4–5 minutes per side until golden and crisp.
Transfer to a plate.
- Brown the beef. In the same skillet, add ground beef. Season with salt and pepper. Cook, breaking it up, until browned and no longer pink, about 5–7 minutes.
Drain excess fat if needed, leaving about 1 tablespoon in the pan.
- Caramelize the onions. Push beef to the side. Add remaining 1 tablespoon butter and the sliced onions. Cook 6–8 minutes, stirring occasionally, until soft and lightly caramelized.
Add garlic and cook 30 seconds until fragrant.
- Season and deglaze. Sprinkle in paprika and stir. Add Worcestershire and beef broth, scraping up browned bits. Simmer 2 minutes to reduce slightly.
- Create the sauce. Lower heat to medium-low.
Stir in sour cream and Dijon until smooth. Taste and adjust salt and pepper. If sauce is too thick, add a splash of broth; too thin, simmer 1–2 minutes.
- Reunite the team. Return pierogi to the skillet, nestling them into the beef and sauce.
Gently toss to coat without breaking them. Warm through for 2–3 minutes.
- Finish and serve. Top with chopped parsley or chives. Optional: a squeeze of lemon for brightness.
Serve hot straight from the skillet. Bonus points for a side of tangy slaw or simple greens.
- Optional veggies. If using mushrooms or peppers, sauté them after the onions for 3–4 minutes before adding broth. For peas, stir in during the final 2 minutes.
Preservation Guide
- Refrigeration: Store leftovers in an airtight container up to 3 days.
Reheat gently on the stovetop with a splash of broth or water.
- Freezing: Best to freeze components separately. Cooked beef and onions freeze well for up to 2 months. Frozen pierogi are already freezer-friendly—cook from frozen when ready.
- Reheating tips: Avoid microwaving on full power; it can make pierogi tough.
Use 50–60% power or a covered skillet over low heat to keep them tender-crisp.
- Make-ahead: Brown the beef and onions the day before. Day-of, crisp the pierogi and finish the sauce. Dinner in 10?
Basically.
What’s Great About This
- Balanced textures: Crispy edges, creamy sauce, and juicy beef—no boring bites here.
- Eastern European vibes, zero intimidation: All the comfort without rolling dough or making dumplings from scratch.
- Scalable: Feeds two or a crowd. Double up in a large sauté pan or run two skillets at once.
- Customizable macros: Go heavier on beef for protein or add more veggies for fiber. You’re in control, captain.
What Not to Do
- Don’t overcrowd the pan. Pierogi steam instead of crisp if packed in.
Work in batches if needed.
- Don’t skip deglazing. Those browned bits are flavor gold. Broth + scrape = instant sauce upgrade.
- Don’t boil the sour cream. High heat can cause curdling. Lower the heat before stirring it in.
- Don’t forget to taste. Layer seasoning at each step.
A final pinch of salt or splash of Worcestershire can be the difference between good and jaw-dropping.
Variations You Can Try
- Mushroom Stroganoff Style: Add 2 cups sliced cremini, extra paprika, and a splash of white wine. Finish with more sour cream for velvet vibes.
- Spicy Kick: Stir in red pepper flakes, a teaspoon of hot paprika, or a spoonful of Calabrian chili paste. Heat seekers, assemble.
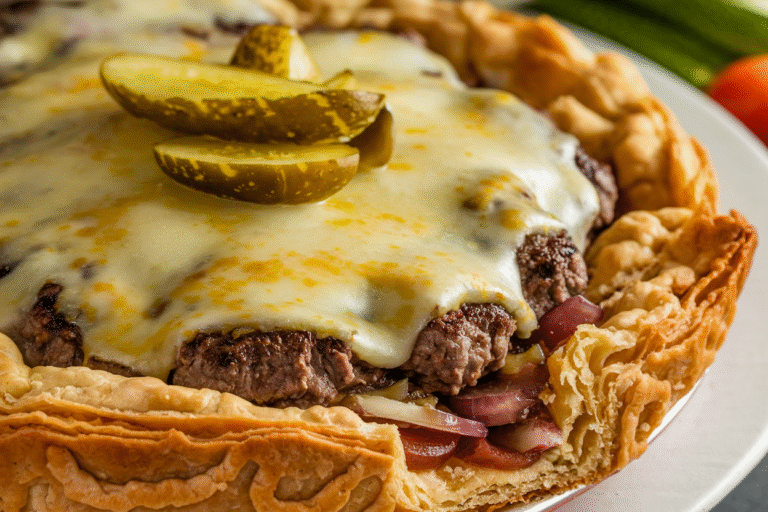
- Cheeseburger Pierogi: Add 1 cup shredded sharp cheddar at the end and top with diced pickles and a drizzle of ketchup-mustard.
Sounds wrong, tastes right.
- Veggie-Loaded: Toss in spinach, peas, and diced peppers. Sub veggie broth and plant-based crumbles for a meatless win.
- Bacon Boost: Crisp 4 slices bacon first. Cook onions in bacon fat, crumble bacon over the finished dish.
Because bacon.
- Herb & Lemon: Add fresh dill and a squeeze of lemon at the end for a lighter, brighter finish.
FAQ
Do I need to boil the pierogi first?
Nope. Frozen pierogi go straight to the skillet. Crisping them in butter and oil builds better texture and flavor than boiling.
Can I use fresh, homemade pierogi?
Yes, but parboil them for 1–2 minutes first so they don’t tear when pan-searing.
Handle gently and reduce searing time.
How do I keep the sour cream from curdling?
Lower the heat before stirring it in and avoid a rolling simmer. If you’re nervous, temper it by whisking in a few spoonfuls of warm pan liquid before adding to the skillet.
What sides go well with this?
A crunchy cucumber-dill salad, simple arugula with lemon vinaigrette, or roasted green beans keep things fresh. Bread is optional but never a bad idea, IMO.
Can I make it dairy-free?
Use dairy-free pierogi if available, swap sour cream for a plant-based version or full-fat coconut yogurt, and cook in oil instead of butter.
Still delicious, FYI.
How spicy is the original recipe?
Very mild. If you want heat, add red pepper flakes or hot paprika during the onion stage, or finish with a dash of hot sauce.
What’s the best pan to use?
A large, heavy skillet—cast iron or stainless steel—helps you get a deep sear on the pierogi and well-browned beef. Nonstick works, but you’ll miss some crust.
Can I substitute the beef?
Totally.
Ground turkey, chicken, pork, or plant-based crumbles are fair game. Adjust seasoning and add a bit more oil with leaner meats.
How do I prevent soggy pierogi?
Start hot, don’t overcrowd, and let each side brown undisturbed before flipping. Return them to the sauce at the end just to coat, not to simmer forever.
Is this meal good for meal prep?
Yes—with a caveat.
Keep the pierogi and sauce separate if prepping ahead. Crisp pierogi right before serving for best texture.
In Conclusion
The Pierogi Beef Skillet is everything you want on a busy night: fast, deeply satisfying, and flexible enough to meet you where your pantry’s at. Crispy dumplings, savory beef, and a tangy, creamy sauce turn a weeknight into a win with almost zero stress.
Keep frozen pierogi on standby and you’ve basically got a secret weapon. Make it once, and it’ll live in your permanent rotation—no arm-twisting required.
Printable Recipe Card
Want just the essential recipe details without scrolling through the article? Get our printable recipe card with just the ingredients and instructions.