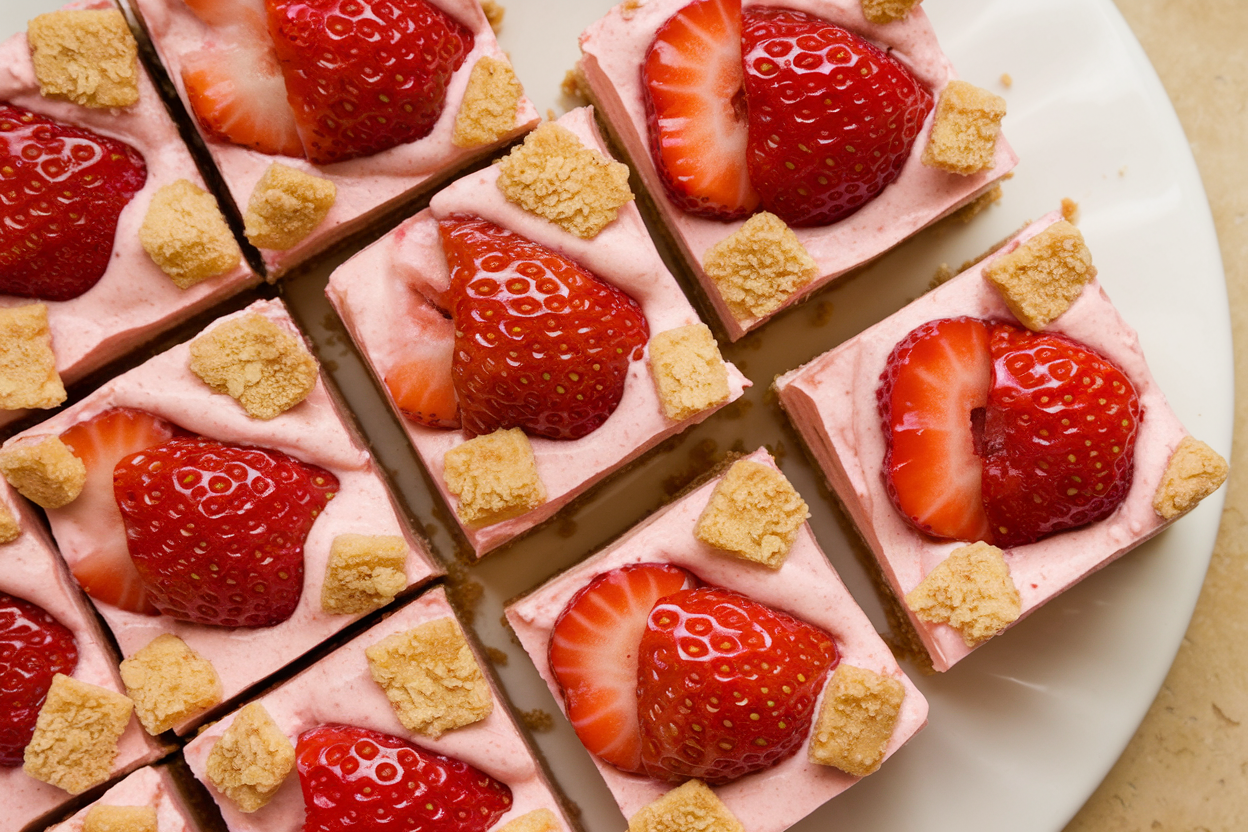
No-Bake Strawberry Dream Bars That Break the Internet: Creamy, Crunchy, Gone in 10 Minutes
Imagine a dessert that tastes like a strawberry cloud fell onto a cookie crust and decided to stay forever. No oven. No stress.
No “wait-for-it-to-cool” drama. These No-Bake Strawberry Dream Bars are the kind of sweet flex you pull when you want applause with minimal effort. Quick to assemble, wildly pretty, and shockingly good—this is the dessert you bring when you want to be “that person” everyone asks for the recipe from.
The Secret Behind This Recipe
The magic is in the contrast: a buttery, crisp crust, a fluffy cream cheese layer, and a juicy strawberry topping that tastes like summer vacation.
Using fresh strawberries gives you brightness and real flavor, while a little strawberry gelatin sets the top just enough to slice cleanly (without turning it into a rubbery science experiment). The cream cheese and whipped topping combo? That’s your silky middle that holds everything together.
It’s basically a cheesecake that never meets an oven and still wins the whole show.
What You’ll Need (Ingredients)
- For the crust:
- 2 cups crushed graham crackers (about 14 full sheets) or vanilla wafer crumbs
- 1/2 cup unsalted butter, melted
- 2 tablespoons granulated sugar
- Pinch of fine sea salt
- For the creamy layer:
- 8 oz cream cheese, softened
- 1/2 cup powdered sugar
- 1 teaspoon pure vanilla extract
- 1 cup cold heavy whipping cream or 8 oz whipped topping (thawed)
- 1 tablespoon lemon zest (optional, but highly recommended)
- For the strawberry layer:
- 3 cups fresh strawberries, hulled and sliced
- 1/3 cup granulated sugar (adjust to taste based on berry sweetness)
- 1 tablespoon lemon juice
- 1 (3 oz) package strawberry gelatin (Jell-O)
- 3/4 cup boiling water
- 1/2 cup cold water
- To finish:
- Extra whipped cream for topping (optional)
- Fresh strawberry slices for garnish
- Crushed freeze-dried strawberries or graham crumbs for a final flourish (optional)
Cooking Instructions
- Prep the pan. Line a 9×9-inch square pan with parchment, leaving overhang for easy lifting. This is your insurance policy.
- Make the crust. Stir graham crumbs, sugar, and salt with melted butter until the texture feels like wet sand. Press firmly into an even layer in the pan.
Use the bottom of a measuring cup to pack it tight—no crumb rebellions allowed.
- Chill the crust. Refrigerate for 15–20 minutes so it sets and turns crisp. A cold base prevents sad, crumbly slices later.
- Whip the cream. If using heavy cream, beat to medium-stiff peaks; set aside. If using whipped topping, keep it chilled until folding time.
- Blend the creamy layer. Beat cream cheese, powdered sugar, and vanilla until smooth and fluffy.
Add lemon zest for a bright pop. Fold in the whipped cream or whipped topping gently to keep the mixture airy.
- Spread the cream layer. Smooth the mixture over the chilled crust. Chill again for at least 20 minutes.
Patience now equals cleaner layers later.
- Prep the strawberries. Toss sliced strawberries with sugar and lemon juice. Let them sit 5–10 minutes to get juicy. You’re building flavor, not just sweetness.
- Make the gelatin mix. Dissolve strawberry gelatin in boiling water, whisking until clear.
Stir in cold water. Let it cool to room temp—slightly thickened but still pourable. Do not pour hot gelatin over the cream layer unless chaos is your brand.
- Assemble the top. Arrange the macerated strawberries over the cream layer. Gently pour the cooled gelatin over the berries, tilting the pan so it seeps into the gaps like a pro.
- Chill to set. Refrigerate for 4 hours (or overnight) until the top is fully set.
Yes, waiting is annoying. Yes, it’s worth it.
- Finish and serve. Lift out using parchment, slice with a hot, dry knife, and top with whipped cream, extra strawberries, and a sprinkle of crumbs or freeze-dried strawberry dust. Applause optional, inevitable.
Preservation Guide
- Refrigeration: Store covered in the fridge for up to 3 days.
The crust stays crisp the first 48 hours; after that it softens, but the flavor stays A+.
- Freezing: Freeze slices on a baking sheet until firm, then wrap individually and store up to 1 month. Thaw in the fridge. Texture remains surprisingly good, FYI.
- Make-ahead: Assemble the crust and cream layer up to 24 hours in advance; add strawberries and gelatin the day you plan to serve for peak freshness.
- Transport tips: Keep chilled in an insulated carrier with ice packs.
Warm cars are the enemy. Be smarter than summer.
Benefits of This Recipe
- No-bake convenience: Zero oven time, zero sweat, maximum reward.
- Speed + simplicity: Easy ingredients, low skill threshold, high payoff. It’s practically foolproof.
- Make it pretty: The ruby-red top looks bakery-level without the bakery-level effort.
- Customizable: Works with gluten-free crumbs, dairy-free swaps, or different fruits.
Consider it your dessert template.
- Light but satisfying: Fluffy cream layer keeps it from being heavy, yet it still feels indulgent. Win-win.
Don’t Make These Errors
- Pouring hot gelatin on the cream layer. It melts the middle and creates a streaky mess. Cool it first until just thickened.
- Skipping the chilling phases. If you don’t set the crust and cream, layers slide like a landslide.
Give it time.
- Over-whipping the cream. You’ll get grainy, broken texture. Aim for medium-stiff peaks, not butter 2.0.
- Watery strawberries. Don’t add excess liquid from the maceration bowl. Spoon berries in, but leave extra juice behind if it seems excessive.
- Loose crust packing. Pack firmly or you’ll be chasing crumbs across your plate like a sitcom character.
Alternatives
- Crust swaps: Use vanilla wafers, shortbread, chocolate wafers, or gluten-free graham crackers.
Chocolate crust with strawberries? Chef’s kiss.
- Dairy-free version: Use dairy-free cream cheese, coconut whipped topping, and plant-based butter. Flavor stays lush.
- Fruit variations: Try raspberries with raspberry gelatin, mixed berries with strawberry gelatin, or peaches with peach gelatin.
Keep the structure, change the vibe.
- Lower sugar: Reduce sugar in berries to taste and use a zero-sugar gelatin. It still sets beautifully, IMO.
- Lemon-lovers: Swap vanilla for lemon extract and add extra zest to the cream layer. Bright, tangy, addictive.
- Party style: Double the recipe for a 9×13-inch pan.
Same method, more fans.
FAQ
Can I use frozen strawberries?
Yes, but thaw and drain them very well before using. Pat dry to remove excess moisture, or your top layer may refuse to set cleanly.
Do I have to use gelatin?
You can skip it and pile on lightly sweetened strawberries, but slices won’t be as tidy. As an alternative, make a quick strawberry compote thickened with cornstarch and cool it completely before layering.
How do I get super-clean slices?
Chill thoroughly, use a hot knife (dip in hot water, wipe dry), and cut straight down.
Clean the blade between cuts. It’s the dessert version of precision engineering.
Can I make this the night before?
Absolutely. Overnight chilling deepens the set and the flavors.
Add decorative toppings (whipped cream, garnish) right before serving for best presentation.
What if I don’t have heavy cream?
Use an 8 oz tub of whipped topping. It’s stable, easy, and gives that classic “fluffy bar” texture.
Why is my crust crumbly?
You likely used too little butter or didn’t pack it firmly. Add another tablespoon of melted butter next time and press hard with a flat cup measure.
How long does the gelatin take to set?
Plan for about 4 hours in the fridge.
If your fridge is packed or opened constantly, add extra time. Patience beats wobbly chaos.
In Conclusion
No-Bake Strawberry Dream Bars are the dessert equivalent of a shortcut that doesn’t feel like one. They’re fast, gorgeous, and ridiculously crowd-pleasing, with a buttery crunch and a creamy center that keeps you coming back for “just one more.” Make them for cookouts, birthdays, or Tuesday—no one’s judging.
Keep the oven off, keep your cool, and let these bars do the heavy lifting.
Printable Recipe Card
Want just the essential recipe details without scrolling through the article? Get our printable recipe card with just the ingredients and instructions.