Fourth of July Berry Cheesecake Cups: The Ultimate Patriotic Dessert You Didn’t Know You Needed
Nothing says July 4th like fireworks, BBQ, and a dessert that steals the show. Enter these Fourth of July Berry Cheesecake Cups—small, stunning, and bursting with red, white, and blue flavor combos that are basically dessert fireworks in your mouth. If you’re tired of the same old pies or flag cakes, these easy-to-make cups deliver elegance without the stress.
Plus, they’re the perfect handheld treat for backyard celebrations or office parties where you want to brag about your baking skills without actually baking all day. Ready for a patriotic win?
Why This Recipe Works
This recipe nails the trifecta of dessert goals: it’s visually striking, ridiculously tasty, and easy to make ahead. The creamy cheesecake base contrasts perfectly with tart berries and a crunchy, buttery crust.
Plus, the layered cups mean no messy slicing—everyone just grabs their own mini masterpiece. And because it’s portioned out, you get the perfect bite every time without feeling like you’ve overindulged (we hope). Bottom line?
This recipe looks like it took forever but actually won’t eat up your whole afternoon.
What Goes Into This Recipe – Ingredients
- 1 cup graham cracker crumbs (about 8 full sheets)
- 3 tablespoons unsalted butter, melted
- 2 tablespoons granulated sugar
- 8 ounces cream cheese, softened
- 1/3 cup powdered sugar
- 1/2 teaspoon vanilla extract
- 1/2 cup heavy whipping cream
- 1 cup strawberries, diced
- 1 cup blueberries
- Fresh mint leaves for garnish (optional but fancy)
Let’s Get Cooking – Instructions
- Make the crust: In a small bowl, combine graham cracker crumbs, melted butter, and sugar. Mix until moistened.
- Assemble the base: Spoon about 2 tablespoons of crust into each dessert cup, pressing gently with the back of a spoon to form a firm layer.
- Prep the cheesecake filling: Beat cream cheese until smooth with powdered sugar and vanilla extract. In a separate bowl, whip heavy cream until stiff peaks form, then fold gently into the cream cheese mixture.
- Layer the filling: Spoon or pipe the cheesecake mixture over the crust in each cup, filling about 3/4 full.
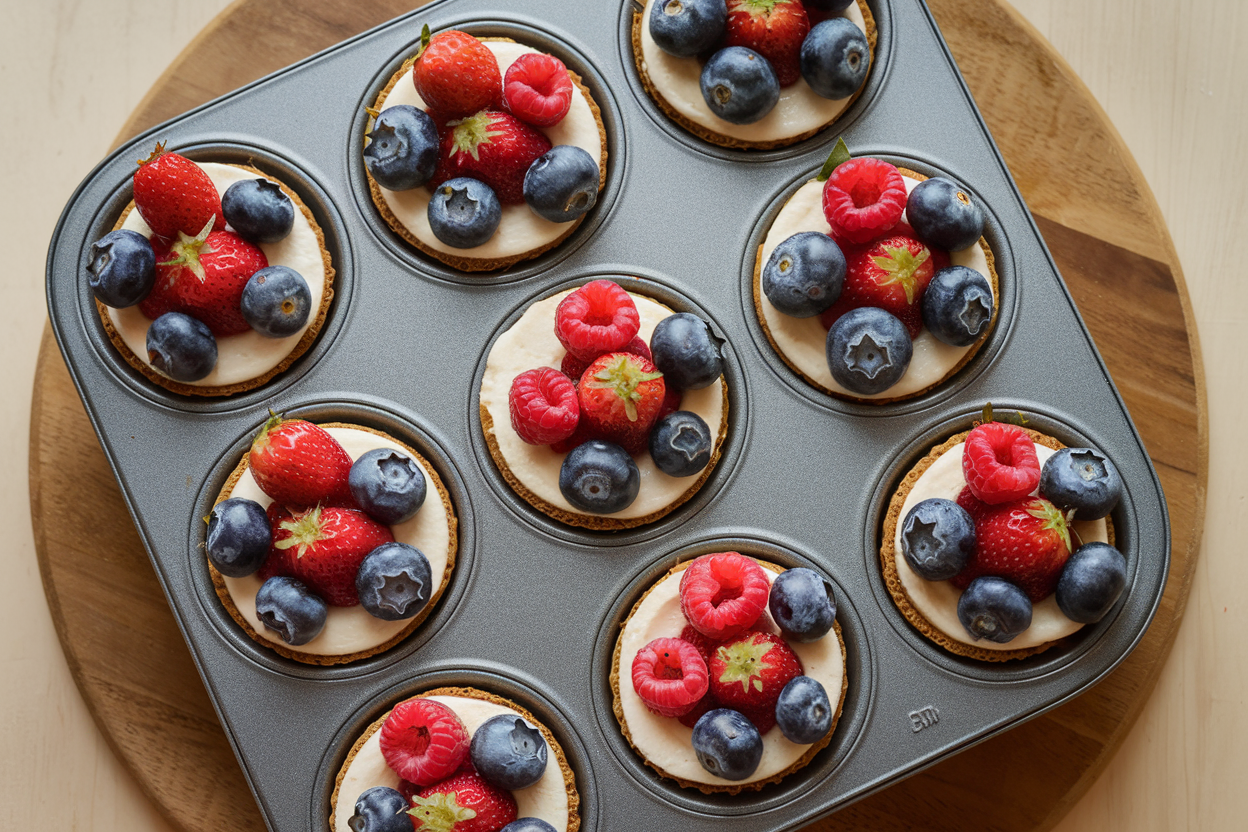
- Add the berries: Top with a festive mix of diced strawberries and blueberries for that perfect red-white-blue vibe.
- Chill time: Refrigerate dessert cups for at least 2 hours (or overnight if you’re planning ahead) to set.
- Garnish and serve: Just before serving, add a fresh mint leaf for a pop of green and that gourmet touch.
How to Store
Keep your berry cheesecake cups covered in the fridge to prevent sniffing other leftovers’ odors.
A tightly sealed container or plastic wrap over the cups works great. These will happily chill for up to 3 days—perfect if you want to prep ahead of your hot July 4th bash. Just resist the temptation to leave them out all day; the cream cheese filling should be kept cold to avoid melt-downs (literal and figurative).
Why This is Good for You
Look, it’s dessert.
It’s not kale chips. But hey, that doesn’t mean you’re indulging recklessly. The fresh berries pack antioxidants and vitamins like vitamin C, while the serving size controls sugar overload.
Plus, swapping out heavy cake for mini cheesecake cups cuts overall calories without sacrificing that creamy satisfaction. And the homemade crust? You know exactly what’s in it—no mystery ingredients or weird preservatives hiding in there.
Common Mistakes to Avoid
- Using cold cream cheese: If your cream cheese isn’t softened, you’ll end up with lumps instead of silky filling.
Patience is a virtue here—let it soften completely.
- Skipping the chill: Trying to serve these right after assembly equals a sad, runny mess. Give them time to firm up.
- Over-mixing the whipped cream: Defeating the purpose of fluffiness by whipping heavy cream too much will turn it into butter. Nobody wants that.
- Ignoring the crust press: Don’t just drop the crust in.
Press it firmly to avoid it crumbling all over your plate or, worse, your clothes.
Different Ways to Make This
- Swap berries: Use raspberries and blackberries instead of just strawberries and blueberries for a darker berry flavor palette.
- Lemon zest twist: Add a teaspoon of lemon zest to the cheesecake filling for a citrusy zing.
- Chocolate drizzle: Melt some white or dark chocolate and drizzle over the top before serving to add an extra layer of indulgence.
- Make it vegan: Use vegan cream cheese and coconut cream, and swap the butter for coconut oil for a dairy-free alternative.
- Crunch factor: Mix crushed nuts like pecans or almonds into the crust for a nutty surprise.
FAQs
Can I make these gluten-free?
Absolutely! Substitute the graham cracker crumbs with gluten-free graham crumbs or crushed gluten-free cookies. Just make sure to check labels to avoid sneaky gluten.
How long do these cheesecake cups last?
Stored in an airtight container in the fridge, they’ll keep fresh for up to three days.
After that, the crust can become soggy, and the berries start to lose their fresh pop.
Can I freeze the cheesecake cups?
Technically yes, but it’s not recommended. Freezing can change the texture of the cheesecake filling and cause the berries to become mushy upon thawing. If you must, freeze before adding the berries and eat within one month.
What can I use instead of heavy cream?
If you don’t have heavy cream, you can try whipping full-fat coconut milk for a similar effect.
Just chill the can overnight first and whip only the solid part.
Do I have to use fresh berries?
Fresh is best to keep the texture and flavor bright. But if you only have frozen berries, thaw and drain them well before topping to avoid sogginess.
My Take
In my humble opinion, these Fourth of July Berry Cheesecake Cups are a game changer. They’re like classic cheesecake’s cool little cousin who showed up at the party wearing red, white, and blue and totally stole the spotlight.
The fact that they’re easy to whip up and portable makes them a no-brainer for summer festivities. Plus, who doesn’t want dessert that looks like it belongs on Instagram? So, whether you’re a kitchen novice or a dessert enthusiast, this recipe is a crowd-pleaser that deserves a spot on your holiday menu—and yes, you’ll get major bragging rights.
Try it once, thank me later.
Printable Recipe Card
Want just the essential recipe details without scrolling through the article? Get our printable recipe card with just the ingredients and instructions.