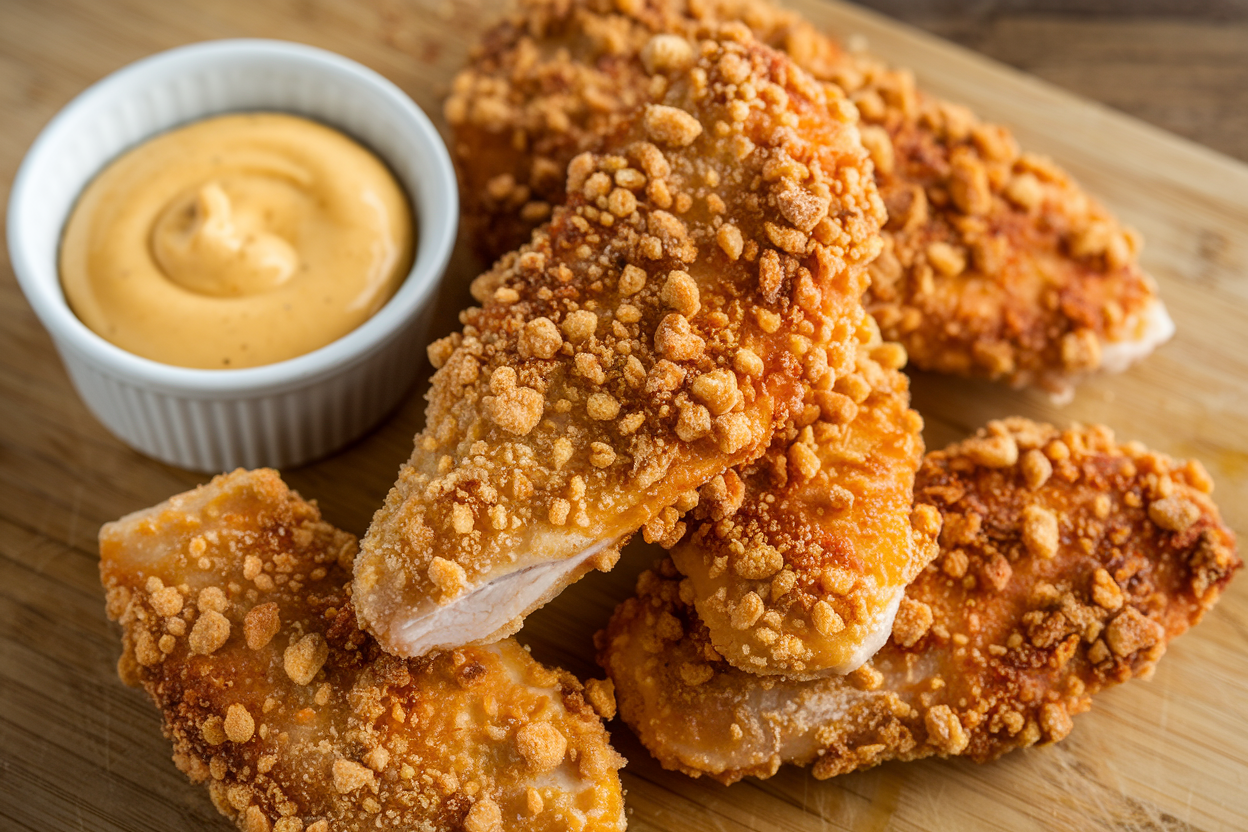
Easy Homemade Crispy Chicken Tenders
Chicken tenders are the ultimate comfort food, but let’s be real—too many recipes leave you with soggy, sad strips that just don’t hit the mark. What if you could master chicken tenders so crispy and juicy, they practically crunch through the screen? Imagine impressing your friends, crushing snack cravings, and turning your kitchen into a crispy haven without hours of prep or fancy ingredients.
You’re about to unlock the secret to irresistibly easy crispy chicken tenders that taste way better than takeout!
What Makes This Recipe Awesome
This recipe is a game-changer because it nails everything you want from chicken tenders: golden, crispy coating, juicy meat, and the perfect seasoning balance. No weird steps, no thousands of ingredients, just straightforward magic. The secret combo?
A double-dip breading that locks in moisture and guarantees extra crunch. Plus, you’ll learn a nifty trick to skip soggy tenders without needing a deep fryer. Whether you’re a kitchen newbie or a seasoned chef, this recipe delivers show-stopping results every time.
Ingredients
- 1 lb chicken tenders (or chicken breasts sliced into strips)
- 1 cup all-purpose flour
- 2 large eggs
- 1 cup panko breadcrumbs (for max crunch)
- 1 tsp garlic powder
- 1 tsp onion powder
- 1 tsp paprika
- ½ tsp salt
- ½ tsp black pepper
- ½ cup buttermilk (optional but recommended for tenderness)
- Vegetable oil (for frying)
Cooking Instructions
- Prep Your Chicken: If using chicken breasts, slice them into thin tender-sized strips.
Pat dry to remove excess moisture.
- Make the Marinade (Optional): Soak chicken tenders in buttermilk for at least 30 minutes. This step boosts juiciness and tenderizes the meat.
- Set Up Your Breading Station: In one shallow bowl, mix flour, garlic powder, onion powder, paprika, salt, and pepper. In the second bowl, beat the eggs.
In the third bowl, pour the panko breadcrumbs.
- Double Dip the Chicken: First, dip each tender in the seasoned flour—shake off the excess. Then dunk into the beaten eggs. Finally, coat well with panko breadcrumbs, pressing gently to stick.
- Heat the Oil: Pour about 1 inch of vegetable oil into a large skillet.
Heat over medium-high until it reaches 350°F (use a thermometer for best results).
- Fry Like a Pro: Carefully place 3-4 tenders in the hot oil without crowding. Fry for 3-4 minutes per side until golden brown and internal temp hits 165°F.
- Drain and Serve: Place cooked tenders on a wire rack or paper towels to drain excess oil. Serve hot with your favorite dipping sauce.
Preservation Guide
Got leftovers?
No problem. Store your chicken tenders in an airtight container in the fridge for up to 4 days. To maintain that juicy crunch, reheat them in a hot oven (around 375°F) on a wire rack for 10-15 minutes—microwaving is a crispy tender’s worst enemy, so don’t go there.
If you want to freeze them, flash freeze on a baking sheet, then transfer to a freezer-safe bag for up to 2 months. Reheat straight from frozen in the oven to keep them crispy.
Nutritional Perks
Chicken tenders get a bad rap in the health department, but homemade ones? Totally different story.
Using lean chicken breast means you get a solid dose of protein without too much fat. By controlling your oil quality and breading thickness, you can keep calories reasonable. Plus, those spices pack a flavorful punch without unnecessary sodium bombs.
Pro tip: swapping regular flour for whole wheat or gluten-free options works great if you want to cater to dietary needs without sacrificing crunch.
What Not to Do
- Don’t skip the buttermilk: If you want juicy tenders, the soak is non-negotiable.
- Avoid overcrowding the pan: Fry in small batches. Crowding causes the oil temperature to drop, resulting in soggy, greasy tenders.
- Don’t forget the double breading: One layer of flour or crumbs won’t cut it—this is the secret to that next-level crunch.
- Never use cold chicken straight from the fridge: Let it sit 10 minutes to reduce temperature shock, ensuring even cooking.
Variations You Can Try
- Spicy Buffalo Style: Toss finished tenders in a mix of melted butter and buffalo sauce for a fiery kick.
- Parmesan Herb: Mix grated Parmesan and Italian seasoning into your panko crumbs for a cheesy twist.
- Oven-Baked Version: Skip frying by baking at 425°F for 20 minutes on a wire rack, flipping halfway through.
- Gluten-Free: Use gluten-free panko and flour blends, and you’re good to go.
FAQ
Can I bake these tenders instead of frying?
Absolutely! Baking is a healthier alternative.
Just preheat your oven to 425°F, place tenders on a wire rack over a sheet pan, and bake for about 20 minutes flipping halfway. The texture won’t be quite as crispy as frying but still excellent.
How do I keep the coating from falling off?
Double dipping is key: flour first, then egg, then breadcrumbs. Pressing the crumbs gently ensures they stick.
Also, frying at the right oil temperature helps the coating to set quickly without sliding off.
What dipping sauces pair best with crispy chicken tenders?
The sky’s the limit! Classic ranch, honey mustard, buffalo sauce, or even a garlic aioli make fantastic companions. IMO, mix and match to keep every bite exciting!
Can I prepare the tenders ahead of time?
Yes! You can bread the chicken tenders and refrigerate them for up to 24 hours before cooking. Just cover them tightly to prevent drying out.
What’s the best oil for frying chicken tenders?
Use neutral oils with high smoke points like vegetable, canola, or peanut oil.
These keep the flavor pure and withstand the heat without burning.
Wrapping Up
There you have it—an effortless, foolproof way to level up your chicken tender game with a crunch so good it’s basically addictive. Whether you’re feeding family, impressing guests, or just rewarding yourself after a long day, these tenders deliver on taste, texture, and satisfaction. So next time the craving hits, don’t settle for mediocre—go straight for these easy crispy chicken tenders and thank yourself later.
Crunch on!
Printable Recipe Card
Want just the essential recipe details without scrolling through the article? Get our printable recipe card with just the ingredients and instructions.