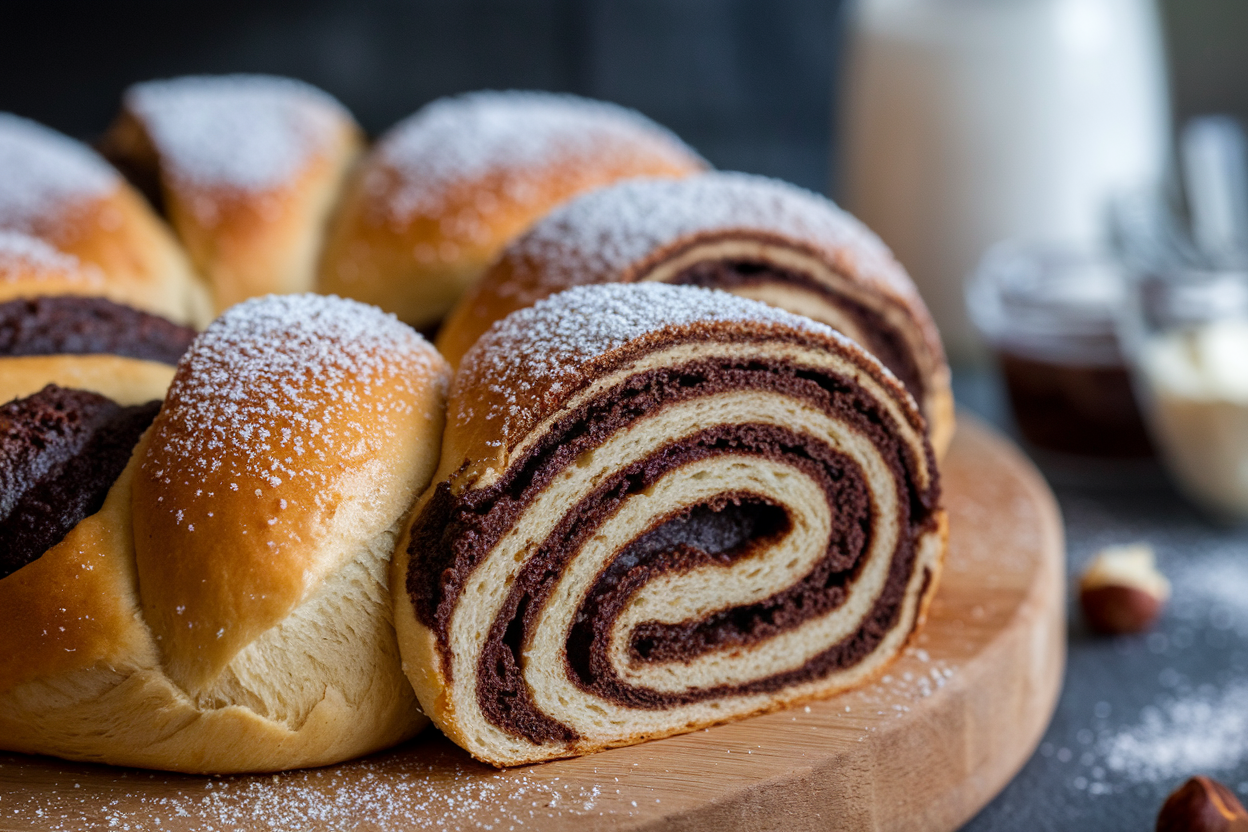
Unlock Your Inner Baker with These Irresistible Chocolate-Hazelnut Babka Buns!
Chocolate and hazelnuts walk into a bakery—and boom, magic happens. Meet the Chocolate-Hazelnut Babka BunsJump to Recipe Card
Why You’ll Love This Recipe
Ever bitten into something that’s crispy on the outside but melt-in-your-mouth soft inside? Yeah, that’s these babka buns.
They’re not just a feast for the eyes; they deliver a textural and flavor explosion you’ll crave on repeat. The chocolate-hazelnut filling is rich yet balanced, making every bite feel indulgent—not overwhelming. Plus, these buns are surprisingly simple to make, perfect whether you want to impress guests or glam up your morning coffee routine.
Oh, and did I mention they freeze like a charm? Talk about a win-win.
What You’ll Need (Ingredients)
- For the dough: 3 ½ cups all-purpose flour
- ¼ cup granulated sugar
- 2 ¼ tsp active dry yeast (1 packet)
- ½ tsp salt
- ¾ cup warm whole milk (about 110°F)
- 2 large eggs
- ½ cup unsalted butter, softened
- For the filling: 1 cup chocolate-hazelnut spread (like Nutella)
- ½ cup toasted hazelnuts, chopped
- For the glaze: 1 egg, beaten (for egg wash)
- 2 tbsp powdered sugar + 1 tbsp water (optional drizzle)
Instructions
- Activate the yeast: In a small bowl, combine warm milk, sugar, and yeast. Let it sit for 5–10 minutes until foamy.
If it doesn’t foam, your yeast is probably dead (RIP).
- Mix the dough: In a large bowl, whisk together flour and salt. Add eggs, softened butter, and the activated yeast mixture. Stir until a shaggy dough forms.
- Knead the dough: Transfer to a floured surface and knead for 8–10 minutes until smooth and elastic.
Or use a stand mixer if you want to skip the workout.
- First rise: Place dough in a lightly oiled bowl, cover with a damp cloth or plastic wrap. Let it rise in a warm spot for 1–1.5 hours until doubled.
- Roll and fill: Punch down dough and roll into a 12×16 inch rectangle. Spread chocolate-hazelnut spread evenly, then sprinkle chopped hazelnuts over it.
- Shape the buns: Roll the rectangle tightly from the long side, pinch the seam shut.
Cut into 12 even slices and place each slice cut-side up in a greased muffin tin or on a lined baking tray.
- Second rise: Cover and let rise for another 30-45 minutes until puffy.
- Bake: Brush tops with egg wash for that glossy finish. Bake at 350°F (175°C) for 20–25 minutes until golden brown.
- Cool and glaze: Let buns cool for 10 minutes, then drizzle with powdered sugar glaze if desired. Try not to inhale the whole batch immediately.
Preservation Guide
Keep it real—these buns are best fresh.
But life happens. Store any leftovers in an airtight container at room temperature for up to 2 days. Want to extend your joy?
Freeze individual buns by wrapping them in plastic wrap and foil—they’ll keep for up to 2 months. When you’re ready to indulge, just microwave for 20-30 seconds or bake slightly to revive the magic.
Why This is Good for You
Sure, these buns are decadently delicious, but they also deliver some perks. The hazelnuts bring healthy fats, fiber, and antioxidants to the table.
Plus, homemade means you control the quality of ingredients—so say goodbye to unpronounceable preservatives. And hey, satisfaction from baking your own treat? That’s a serious mood boost right there.
Just remember, balance is key, but every once in a while, you deserve to treat yo’ self.
Don’t Make These Errors
- Don’t skip proofing the yeast. If your yeast doesn’t bubble, your dough won’t rise—and you’ll end up with sad, dense buns.
- Avoid spreading cold filling. Warm your chocolate-hazelnut spread slightly—it’s way easier to work with and spreads evenly, no tearing the dough.
- Don’t overcrowd the baking pan. Give those buns room; otherwise, they’ll sweat and stick together instead of getting that perfect crust.
- Resist the urge to open the oven mid-bake. Let the buns bake undisturbed; impatient peeking = deflation disaster.
Variations You Can Try
- Switch Up the Nuts: Use chopped almonds, pecans, or walnuts instead of hazelnuts—same crunch, fresh twist.
- Go Vegan: Swap milk for any plant-based alternative and use coconut oil in place of butter. Use a flax egg instead of the egg wash.
- Fruit Flair: Toss in some dried cherries or raspberries with the filling to add a tart contrast.
- Spice it Up: Add a sprinkle of cinnamon or a pinch of cayenne to the chocolate spread for a hint of warmth and surprise.
FAQ
Can I use store-bought chocolate-hazelnut spread?
Absolutely! Most people do.
Just make sure to warm it slightly so it spreads smoothly, or else it’s like trying to paint with glue.
How do I know when the dough has risen enough?
Poke the dough gently with your finger—if the indentation springs back slowly but not completely, you’re good. If it’s too quick or not at all, give it more or less time accordingly.
Can I make these buns gluten-free?
You can try, but gluten-free doughs behave very differently. You’d likely need a specialized blend and some trial and error to get fluffy results.
Worth it if you’re committed.
What’s the best way to reheat these buns?
Microwave for a few seconds or warm them in an oven at 300°F for 5–7 minutes. Just don’t overdo it or they’ll dry out faster than your phone battery on Instagram scrolling.
Can I double the recipe for a bigger batch?
Sure thing! Just make sure your mixing bowl and oven have the space—and remember, fresher batch wins, so consider baking in batches.
My Take
These Chocolate-Hazelnut Babka Buns aren’t just a recipe; they’re an experience.
From the first fluff of dough to that final, glossy bite, they manage to be both cozy home-baked comfort food and an impressive bakery-level treat. Honestly, once you get the hang of the process, you’ll wonder why you ever settled for store-bought pastries. So grab your ingredients, kick flour into the air, and embrace a little sweet chaos.
Trust me, the reward is oh-so-worth-it. Because life’s better with chocolate, hazelnuts, and a little doughy goodness.
Printable Recipe Card
Want just the essential recipe details without scrolling through the article? Get our printable recipe card with just the ingredients and instructions.