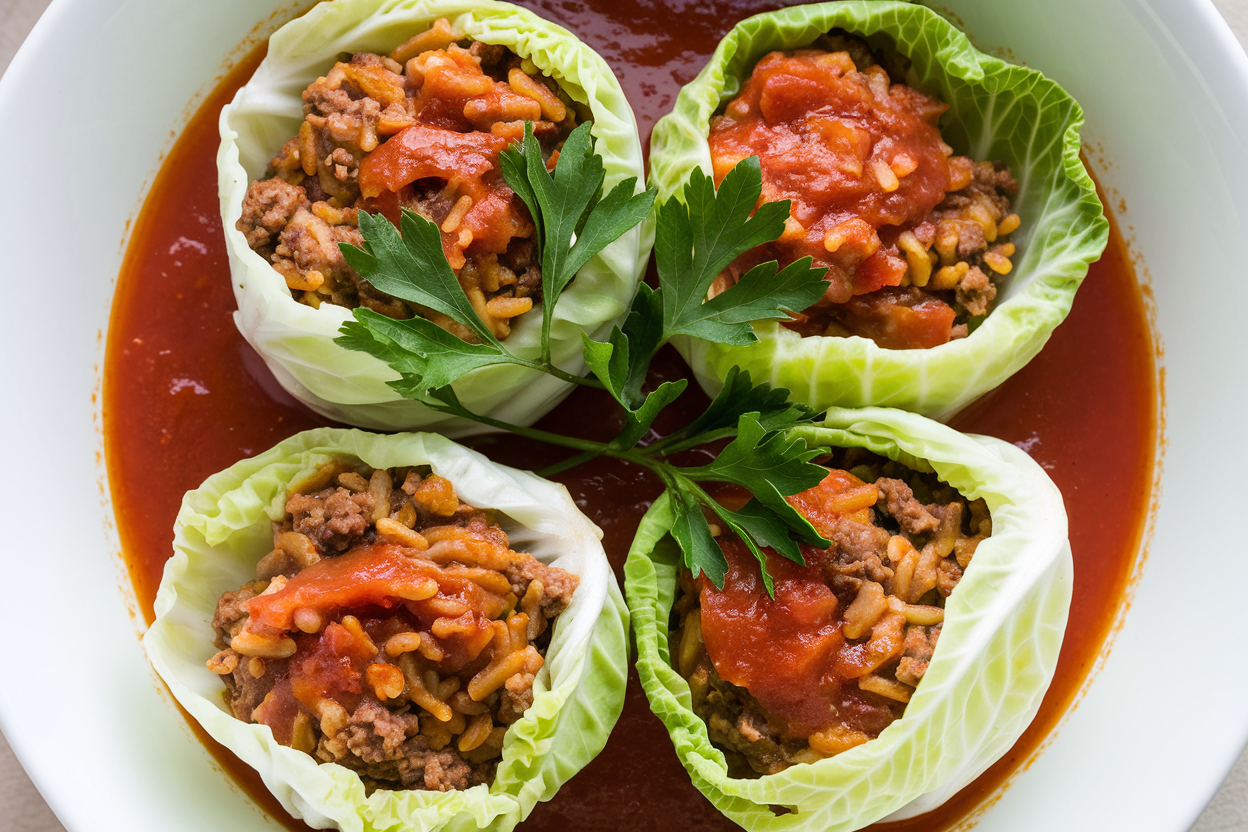
Stuffed Cabbage Cups: The Bite-Size Comfort Food Hack You’ll Crave on Repeat
You know those recipes that look fancy, hit all the cozy cravings, and somehow still fit on a weeknight? This is that. Stuffed Cabbage Cups pack all the flavor of grandma’s cabbage rolls into a smart, handheld, no-fuss format.
They’re juicy, savory, and shockingly tidy—like meal prep got a glow-up. Bring them to a potluck, serve them for dinner, or snack on them straight from the fridge. No one’s judging.
What Makes This Recipe Awesome
- All the flavor, none of the hassle: Traditional stuffed cabbage is great, but rolling leaves for an hour?
Hard pass. These cups skip the roll and keep the soul.
- Built-in portion control: Each cabbage leaf becomes its own edible bowl. Perfect for parties, lunches, or your “I’m being good” days.
- Flexible and forgiving: Ground beef, turkey, or plant-based?
Rice or quinoa? Spicy or mild? This recipe adapts to your vibe.
- Meal-prep friendly: They reheat like a dream and freeze beautifully.
Future you will send a thank-you note.
- Major comfort factor: Savory meat, tender cabbage, tangy-sweet tomato sauce—this hits the nostalgic button hard.
Ingredients
- 1 large green cabbage (look for one with flexible outer leaves)
- 1 lb ground beef (or turkey, chicken, pork, or plant-based crumbles)
- 1/2 cup uncooked white rice (or 1 cup cooked; see instructions)
- 1 small onion, finely diced
- 3 cloves garlic, minced
- 1 large egg
- 1/3 cup breadcrumbs (or oat flour for GF)
- 2 tbsp fresh parsley, chopped (or 2 tsp dried)
- 1 tsp smoked paprika
- 1 tsp dried oregano
- 1/2 tsp ground cumin (optional but recommended)
- 1 1/2 tsp kosher salt, plus more for blanching
- 1/2 tsp black pepper
- 1 cup tomato sauce
- 1/3 cup ketchup (or tomato paste + 1 tsp honey)
- 1 tbsp Worcestershire sauce (use GF or coconut aminos if needed)
- 1 tbsp brown sugar or honey
- 2 tbsp olive oil, divided
- 1/2 cup low-sodium broth (chicken or vegetable)
- Red pepper flakes to taste (optional)
- Fresh lemon for finishing (optional)
Let’s Get Cooking – Instructions
- Par-cook the rice: Rinse and boil the rice for 8 minutes until just shy of tender. Drain and set aside. If using pre-cooked rice, skip this step and measure 1 cup cooked.
- Prep the cabbage leaves: Bring a large pot of salted water to a boil.
Carefully remove 12–14 outer cabbage leaves. Blanch 3–4 leaves at a time for 2 minutes until pliable, then shock in ice water. Drain and pat dry.
- Trim the ribs: Use a paring knife to shave the thick stem on each leaf so it folds easily without cutting through.
- Mix the filling: In a large bowl, combine ground meat, par-cooked rice, diced onion, garlic, egg, breadcrumbs, parsley, smoked paprika, oregano, cumin, salt, and pepper.
Mix gently until just combined. Don’t overwork it.
- Make the sauce: In a separate bowl, whisk tomato sauce, ketchup, Worcestershire, brown sugar, 1 tbsp olive oil, and a pinch of red pepper flakes. Taste and adjust salt/sweetness.
- Preheat and prep: Heat oven to 375°F (190°C).
Lightly oil a 9×13-inch baking dish with remaining 1 tbsp olive oil.
- Form the cups: Lay a cabbage leaf in your palm or on a board. Cup it to form a bowl and spoon in 1/4 to 1/3 cup filling (about a golf ball). Fold edges slightly inward to cradle the filling—no tight wrapping needed.
Repeat.
- Pan-sear for extra flavor (optional but awesome): Heat a skillet over medium-high. Sear the bottoms of the cups 1–2 minutes to get light browning. Transfer to the baking dish, seam side down.
- Sauce and bake: Pour half the sauce into the baking dish with the broth.
Nestle cups in. Spoon remaining sauce over the tops. Cover tightly with foil.
- Bake to tender: Bake 35–40 minutes covered, then uncover and bake 10–15 minutes more until the cabbage is tender and the centers read 165°F (74°C) for poultry or 160°F (71°C) for beef/pork.
- Finish and serve: Rest 5 minutes.
Squeeze a little lemon over the tops for brightness and shower with extra parsley. Serve with mashed potatoes, crusty bread, or a simple salad.
Keeping It Fresh
- Fridge: Store in an airtight container up to 4 days. The flavors actually improve by day two—like magic, but edible.
- Freeze: Cool completely, then freeze in a single layer before transferring to a bag or container for up to 3 months.
Thaw overnight in the fridge for best texture.
- Reheat: Oven at 325°F (165°C) for 15–20 minutes covered with a splash of broth or water. Microwave on 60–70% power in short bursts to avoid rubbery cabbage.
What’s Great About This
- Balanced and satisfying: Protein, fiber, and carbs in one neat package. Your meal prep spreadsheet will be thrilled, FYI.
- Low waste: Cabbage is the wrapper and the serving vessel.
Minimal dishes, maximal applause.
- Affordable: Pantry ingredients, budget-friendly meat, and a humble cabbage. Feels fancy, costs less than takeout.
- Great for crowds: Easy to double and keep warm. They hold structure, so no messy scooping chaos.
Avoid These Mistakes
- Skipping the blanch: Raw leaves crack and fight you.
Blanching turns enemies into allies.
- Overpacking the cups: Too much filling = undercooked centers. Aim for even golf-ball portions.
- Dry filling: Rice needs moisture. Keep sauce in the pan and a little broth in the dish so everything stays juicy.
- Overmixing the meat: That’s how you get tough, bouncy meatballs (not the goal).
Mix gently until combined.
- Forgetting acidity: A squeeze of lemon or a splash of vinegar at the end wakes up the whole dish. Your taste buds will notice.
Mix It Up
- Mediterranean: Use ground lamb or turkey, swap parsley for mint + dill, add cinnamon and feta, and finish with a lemony yogurt drizzle.
- Smoky BBQ: Replace ketchup with BBQ sauce, add chili powder, and top with pickled onions. Hello, backyard hero.
- Plant-based: Use plant-based ground, cooked quinoa instead of rice, and flax egg (1 tbsp ground flax + 3 tbsp water).
Add chopped mushrooms for umami.
- Low-carb: Skip rice and add finely riced cauliflower. Increase breadcrumbs slightly or add grated zucchini squeezed dry for moisture.
- Spicy: Stir in harissa or gochujang to the sauce. Not for the faint of heart, IMO.
- Cheesy finish: Last 10 minutes, top with shredded mozzarella or provolone.
Melty blanket = instant comfort.
FAQ
Can I use savoy or Napa cabbage instead?
Yes. Savoy is actually fantastic because the leaves are more tender and flexible. Napa works too, but the leaves are thinner—stack or double up if needed.
Do I have to pre-cook the rice?
Par-cooking ensures the rice finishes at the same time as the meat.
If you use fully cooked rice, reduce the breadcrumbs slightly and add 2–3 tablespoons extra sauce to keep the filling moist.
What if I don’t have an oven?
Use a deep skillet with a lid. Nestle the cups, add sauce and broth, cover, and simmer on low for 30–40 minutes until tender. Uncover for a few minutes to thicken.
How do I make this gluten-free?
Swap breadcrumbs for gluten-free crumbs or oat flour and use a GF Worcestershire or coconut aminos.
Everything else is naturally gluten-free.
Can I make these ahead?
Absolutely. Assemble up to a day in advance, cover tightly, and refrigerate. Add 5–10 extra minutes to the bake time if going in cold.
Why is my cabbage tough?
It needed either a longer blanch or a longer bake.
Every cabbage head varies. Keep it covered longer to steam, then uncover to finish.
What’s the best meat to use?
An 85/15 ground beef blend nails the juicy factor. Turkey works great—just add an extra tablespoon of olive oil to the filling to keep it moist.
The Bottom Line
Stuffed Cabbage Cups are the clever shortcut to a timeless classic—tidy, flavorful, and weeknight-friendly without tasting like a compromise.
They’re customizable, freezer-friendly, and almost impossible to mess up if you follow the simple cues. Make a batch, stash some for later, and enjoy the kind of comfort food that actually fits your life. Your future self (and your dinner guests) will be very, very pleased.
Printable Recipe Card
Want just the essential recipe details without scrolling through the article? Get our printable recipe card with just the ingredients and instructions.