Homemade Freezer Burritos That Taste Like a Million Bucks (But Cost Pennies)
You want dinners that stack up like money in the bank? Make a dozen burritos in under an hour, stash them in your freezer, and eat like a boss all week. No soggy cafeteria vibes, no mystery meat—just hot, melty, flavor-packed wraps that actually hold together.
These Homemade Freezer Burritos crush takeout on speed, cost, and satisfaction. Cook once, eat many, and laugh at your future self who “doesn’t have time to cook.”
Why This Recipe Works
Freezer burritos win because they’re built for durability and taste. A smart filling ratio—protein, beans, rice, and a little sauce—prevents sogginess and keeps every bite balanced.
Using sturdy, large tortillas and cooling the filling first avoids tears and leaks. Plus, a quick toast after microwaving revives that fresh-off-the-griddle vibe. The result?
Burritos that freeze like a dream and reheat with zero sadness.
Shopping List – Ingredients
- 10–12 large (10-inch) flour tortillas – burrito-size, pliable
- 1.5 pounds ground beef or turkey – or use plant-based crumbles
- 1 yellow onion, finely diced
- 3 cloves garlic, minced
- 1 bell pepper, diced (optional but great)
- 1 can (15 oz) black beans, drained and rinsed
- 2 cups cooked rice – white, brown, or cilantro-lime
- 1 cup corn kernels – frozen or canned, drained
- 1–1.5 cups shredded cheese – cheddar, Monterey Jack, or pepper jack
- 1 can (8 oz) tomato sauce or 1 cup mild salsa (not watery)
- 2–3 tablespoons taco seasoning – or your own blend (chili, cumin, paprika, oregano, salt)
- 2 tablespoons olive oil
- Salt and pepper to taste
- Fresh cilantro, chopped (optional)
- Lime, for finishing (optional but excellent)
Let’s Get Cooking – Instructions
- Cook the rice first. Leftover rice is king here. Fluffy, not wet. If cooking fresh, spread it on a sheet pan to steam off excess moisture.
- Brown the meat. Heat olive oil in a large skillet over medium-high.
Add onion and bell pepper; cook 3–4 minutes until softened. Add garlic and cook 30 seconds. Add meat, season with salt and pepper, and brown fully.
- Spice it up. Stir in taco seasoning and tomato sauce (or thick salsa).
Simmer 2–3 minutes until slightly reduced and saucy, not watery.
- Add the mix-ins. Fold in black beans and corn. Taste and adjust salt. Off heat, stir in a squeeze of lime and cilantro if using.
- Cool it down. Important: Spread the filling on a sheet pan or in a wide bowl and let it cool to warm room temp.
Hot filling = soggy tortillas and steam explosions. Hard pass.
- Warm the tortillas. Microwave a stack wrapped in a damp towel for 30–45 seconds until pliable. Warm tortillas roll without cracking—basic physics.
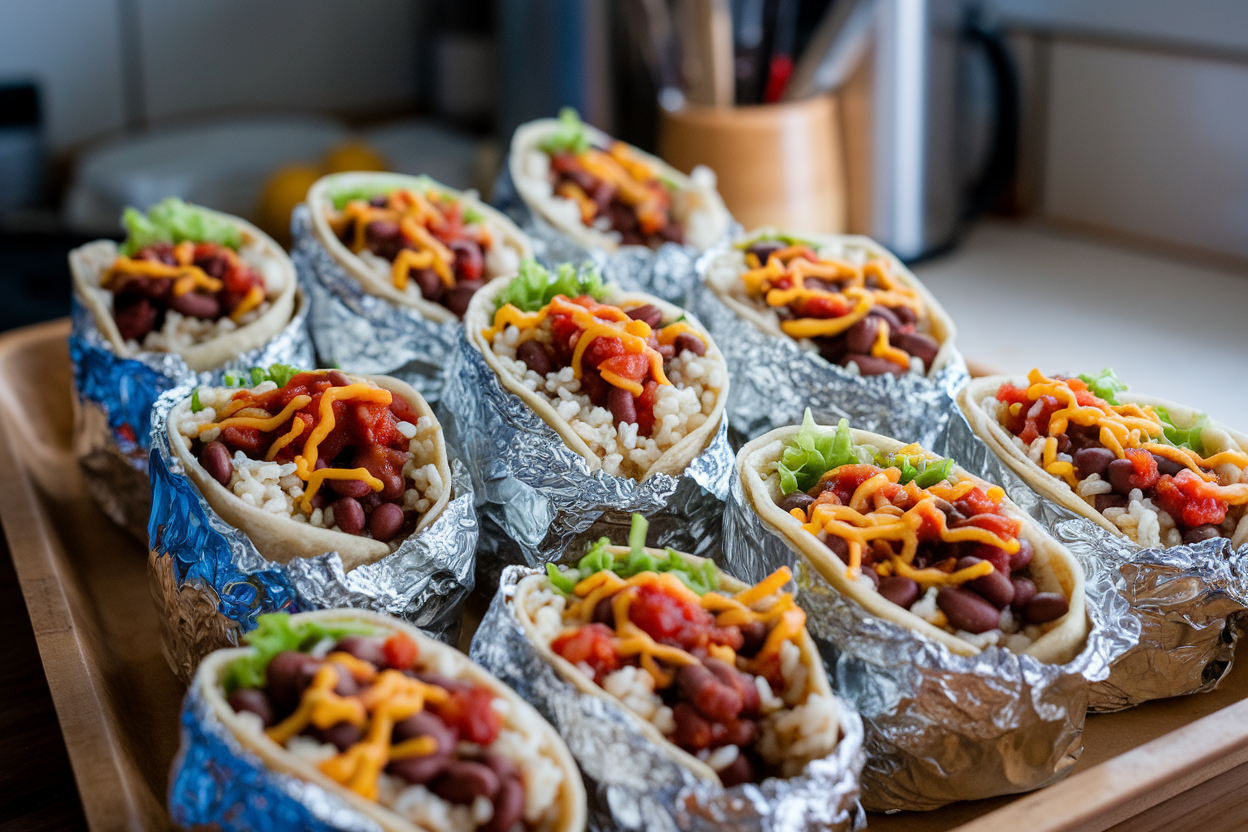
- Assemble. On each tortilla, add about 1/2 cup rice, 1/2–2/3 cup filling, and a sprinkle of cheese.
Keep the filling in a tight line. Don’t overstuff unless you enjoy burrito confetti.
- Roll tight. Fold sides in, then roll from the bottom, tucking as you go. Aim for firm, compact, confident burritos.
You’re the boss here.
- Flash-freeze. Place rolled burritos seam-side down on a parchment-lined sheet. Freeze 1–2 hours until solid. This prevents sticking and keeps shapes nice.
- Wrap for storage. Best practice: Wrap each burrito in foil or parchment, then place in a zip-top freezer bag.
Label with date and flavor because future-you will forget.
Storage Instructions
Freezer: Store wrapped burritos in freezer bags for up to 3 months. Squeeze out excess air to dodge freezer burn. Stack flat for easy organization.
Reheat (Microwave + Toast): Unwrap, place on a microwave-safe plate, and cover with a damp paper towel.
Microwave 2–3 minutes from frozen (flip halfway), then finish in a hot skillet 1–2 minutes per side to crisp. This combo method is elite.
Oven Method: Keep burritos wrapped in foil and bake at 375°F (190°C) for 30–40 minutes, then unwrap and broil 1–2 minutes for a toasty finish.
Air Fryer: 350°F (175°C) for 12–15 minutes, flipping halfway. If the exterior gets dark before the center is hot, microwave 60–90 seconds first, then crisp in the air fryer.
Benefits of This Recipe
- Time leverage: One cooking session yields a week (or more) of grab-and-go meals.
- Budget-friendly: Rice and beans stretch protein without sacrificing flavor.
Your wallet says thanks.
- Customizable: Protein, spice level, veggies—make it your signature.
- Portion control: Built-in serving sizes keep things simple.
- Consistently good: The filling ratio and cooling step keep sogginess away. No sad burritos, ever.
What Not to Do
- Don’t use watery salsa or wet rice. Moisture ruins texture and turns tortillas mushy.
- Don’t skip cooling the filling. Steam is your enemy. Patience pays, IMO.
- Don’t overstuff. If you need two hands and a prayer to roll it, it’s too full.
- Don’t use tiny tortillas. You’ll be wrapping a stress burrito.
Go burrito-size or bust.
- Don’t forget the final toast. That quick skillet or air fryer crisp is the difference between “okay” and “whoa.”
Recipe Variations
- Breakfast Burritos: Swap meat for crumbled breakfast sausage or bacon; add soft scrambled eggs, hash browns, and cheese. Use salsa verde instead of tomato sauce.
- Chicken Fajita Style: Use shredded rotisserie chicken with sautéed peppers and onions, a splash of lime, and pepper jack cheese.
- Veggie Supreme: Skip meat; double beans and add sautéed zucchini, mushrooms, and spinach. Season aggressively so it slaps.
- Barbacoa or Carnitas: Use leftover slow-cooked beef or pork with rice, beans, and a little chipotle sauce.
Big flavor, minimal work.
- Southwest Quinoa: Swap rice for quinoa, add black beans, corn, and roasted sweet potato. Great protein bump for plant-based eaters.
- Spicy Buffalo: Shredded chicken tossed with buffalo sauce, black beans, rice, and a little ranch or blue cheese. Not traditional, but dangerously good.
FAQ
How do I keep tortillas from tearing?
Use fresh, burrito-size tortillas and warm them before filling.
If a brand keeps cracking, try a different one—some are just drier. Rolling tightly while keeping the filling centered also prevents stress tears.
Can I add sour cream before freezing?
Better not. Sour cream can separate and get weird in the freezer.
Add it after reheating or tuck a small container in your lunch bag. Greek yogurt works great as a fresh topper too.
What’s the best cheese for freezer burritos?
Cheddar, Monterey Jack, or pepper jack melt beautifully and freeze well. Avoid fresh mozzarella or very soft cheeses—they release water.
Pre-shredded is fine, but freshly shredded melts smoother.
How do I prevent soggy burritos when reheating?
Keep fillings on the dry side, cool before rolling, and use the microwave-then-skillet method. The skillet step re-crisps the tortilla and evaporates surface moisture fast. FYI, a minute in a hot pan is magic.
Can I make them gluten-free?
Yes—use large, flexible gluten-free tortillas and don’t overfill.
Warm them thoroughly before rolling, as GF wraps can be fragile. Corn tortillas are tough for burrito-size, but work for smaller frozen wraps.
How many can I make at once?
Scale up to 20–24 easily if your freezer can handle it. Batch the assembly: lay out tortillas, add all rice, then filling, then cheese.
Efficient assembly lines aren’t just for factories.
Do I need to thaw before reheating?
No, reheating from frozen is fine. If you thaw in the fridge overnight, reduce microwave time by about half and keep the skillet finish for crispness.
Wrapping Up
Homemade Freezer Burritos give you maximum payoff with minimal daily effort. Build a balanced, sturdy filling, roll tight, freeze smart, and reheat like a pro.
You’ll save money, eat better, and crush the “what’s for dinner?” panic. Make a batch this week and thank yourself every time you press “start” on the microwave and hear destiny humming.
Printable Recipe Card
Want just the essential recipe details without scrolling through the article? Get our printable recipe card with just the ingredients and instructions.